Draft:Shiren 6:Top Menu: Difference between revisions
(→Icons) |
(→Icons) |
||
| Line 29: | Line 29: | ||
|- | |- | ||
![[File:Shiren 6 - Top Menu Story Arc Icon 1.png]] | ![[File:Shiren 6 - Top Menu Story Arc Icon 1.png]] | ||
|{{Shiren6|Serpentcoil Island (Story Arc)}} | |{{Shiren6|Serpentcoil Island (Story Arc)|Serpentcoil Island}} | ||
| | | | ||
| | | | ||
|- | |- | ||
![[File:Shiren 6 - Top Menu Story Arc Icon 2.png]] | ![[File:Shiren 6 - Top Menu Story Arc Icon 2.png]] | ||
|{{Shiren6|Suiryu (Story Arc)}} | |{{Shiren6|Suiryu (Story Arc)|Suiryu}} | ||
| | | | ||
| | | | ||
|- | |- | ||
![[File:Shiren 6 - Top Menu Story Arc Icon 3.png]] | ![[File:Shiren 6 - Top Menu Story Arc Icon 3.png]] | ||
|{{Shiren6|Kokatsu (Story Arc)}} | |{{Shiren6|Kokatsu (Story Arc)|Kokatsu}} | ||
| | | | ||
| | | | ||
| Line 54: | Line 54: | ||
|- | |- | ||
![[File:Shiren 6 - Top Menu Story Arc Icon 6.png]] | ![[File:Shiren 6 - Top Menu Story Arc Icon 6.png]] | ||
|{{Shiren6|Peach Club (Story Arc)}} | |{{Shiren6|Peach Club (Story Arc)|Peach Club}} | ||
| | | | ||
| | | | ||
|- | |- | ||
![[File:Shiren 6 - Top Menu Story Arc Icon 7.png]] | ![[File:Shiren 6 - Top Menu Story Arc Icon 7.png]] | ||
|{{Shiren6|Secret Ninja Village (Story Arc)}} | |{{Shiren6|Secret Ninja Village (Story Arc)|Secret Ninja Village}} | ||
| | | | ||
| | | | ||
|- | |- | ||
![[File:Shiren 6 - Top Menu Story Arc Icon 8.png]] | ![[File:Shiren 6 - Top Menu Story Arc Icon 8.png]] | ||
|{{Shiren6|Secluded Path (Story Arc)}} | |{{Shiren6|Secluded Path (Story Arc)|Secluded Path}} | ||
| | | | ||
| | | | ||
|- | |- | ||
![[File:Shiren 6 - Top Menu Story Arc Icon 9.png]] | ![[File:Shiren 6 - Top Menu Story Arc Icon 9.png]] | ||
|{{Shiren6|Ghost Ship (Story Arc)}} | |{{Shiren6|Ghost Ship (Story Arc)|Ghost Ship}} | ||
| | | | ||
| | | | ||
|- | |- | ||
![[File:Shiren 6 - Top Menu Story Arc Icon 10.png]] | ![[File:Shiren 6 - Top Menu Story Arc Icon 10.png]] | ||
|{{Shiren6|Golden Highway (Story Arc)}} | |{{Shiren6|Golden Highway (Story Arc)|Golden Highway}} | ||
| | | | ||
| | | | ||
| Line 84: | Line 84: | ||
|- | |- | ||
![[File:Shiren 6 - Top Menu Story Arc Icon 12.png]] | ![[File:Shiren 6 - Top Menu Story Arc Icon 12.png]] | ||
|{{Shiren6|Yamakagashi Pass (Story Arc)}} | |{{Shiren6|Yamakagashi Pass (Story Arc)|Yamakagashi Pass}} | ||
| | | | ||
| | | | ||
| Line 94: | Line 94: | ||
|- | |- | ||
![[File:Shiren 6 - Top Menu Story Arc Icon 14.png]] | ![[File:Shiren 6 - Top Menu Story Arc Icon 14.png]] | ||
|{{Shiren6|Training Path of Inference (Story Arc)}} | |{{Shiren6|Training Path of Inference (Story Arc)|Training Path of Inference}} | ||
| | | | ||
|Complete {{Shiren6|Training Path of Extra Inference}}. | |Complete {{Shiren6|Training Path of Extra Inference}}. | ||
|- | |- | ||
![[File:Shiren 6 - Top Menu Story Arc Icon 15.png]] | ![[File:Shiren 6 - Top Menu Story Arc Icon 15.png]] | ||
|{{Shiren6|Asuka (Story Arc)}} | |{{Shiren6|Asuka (Story Arc)|Asuka}} | ||
| | | | ||
| | | | ||
|- | |- | ||
![[File:Shiren 6 - Top Menu Story Arc Icon 16.png]] | ![[File:Shiren 6 - Top Menu Story Arc Icon 16.png]] | ||
|{{Shiren6|Porky the Pirate (Story Arc)}} | |{{Shiren6|Porky the Pirate (Story Arc)|Porky the Pirate}} | ||
| | | | ||
| | | | ||
|- | |- | ||
![[File:Shiren 6 - Top Menu Story Arc Icon 17.png]] | ![[File:Shiren 6 - Top Menu Story Arc Icon 17.png]] | ||
|{{Shiren6|Tugai (Story Arc)}} | |{{Shiren6|Tugai (Story Arc)|Tugai}} | ||
| | | | ||
| | | | ||
|- | |- | ||
![[File:Shiren 6 - Top Menu Story Arc Icon 18.png]] | ![[File:Shiren 6 - Top Menu Story Arc Icon 18.png]] | ||
|{{Shiren6|Hibiki (Story Arc)}} | |{{Shiren6|Hibiki (Story Arc)|Hibiki}} | ||
| | | | ||
| | | | ||
|- | |- | ||
![[File:Shiren 6 - Top Menu Story Arc Icon 19.png]] | ![[File:Shiren 6 - Top Menu Story Arc Icon 19.png]] | ||
|{{Shiren6|Sumo Dungeon (Story Arc)}} | |{{Shiren6|Sumo Dungeon (Story Arc)|Sumo Dungeon}} | ||
| | | | ||
| | | | ||
| Line 134: | Line 134: | ||
|- | |- | ||
![[File:Shiren 6 - Top Menu Story Arc Icon 22.png]] | ![[File:Shiren 6 - Top Menu Story Arc Icon 22.png]] | ||
|{{Shiren6|Training Path of Gimmicks (Story Arc)}} | |{{Shiren6|Training Path of Gimmicks (Story Arc)|Training Path of Gimmicks}} | ||
| | | | ||
| | | | ||
|- | |- | ||
![[File:Shiren 6 - Top Menu Story Arc Icon 23.png]] | ![[File:Shiren 6 - Top Menu Story Arc Icon 23.png]] | ||
|{{Shiren6|Training Path of Shopping (Story Arc)}} | |{{Shiren6|Training Path of Shopping (Story Arc)|Training Path of Shopping}} | ||
| | | | ||
| | | | ||
|- | |- | ||
![[File:Shiren 6 - Top Menu Story Arc Icon 24.png]] | ![[File:Shiren 6 - Top Menu Story Arc Icon 24.png]] | ||
|{{Shiren6|Behemoth Rush (Story Arc)}} | |{{Shiren6|Behemoth Rush (Story Arc)|Behemoth Rush}} | ||
| | | | ||
| | | | ||
|- | |- | ||
![[File:Shiren 6 - Top Menu Story Arc Icon 25.png]] | ![[File:Shiren 6 - Top Menu Story Arc Icon 25.png]] | ||
|{{Shiren6|Sacred Ocean Tunnel (Story Arc)}} | |{{Shiren6|Sacred Ocean Tunnel (Story Arc)|Sacred Ocean Tunnel}} | ||
| | | | ||
| | | | ||
|- | |- | ||
![[File:Shiren 6 - Top Menu Story Arc Icon 26.png]] | ![[File:Shiren 6 - Top Menu Story Arc Icon 26.png]] | ||
|{{Shiren6|Domain of Staves and Scrolls (Story Arc)}} | |{{Shiren6|Domain of Staves and Scrolls (Story Arc)|Domain of Staves and Scrolls}} | ||
| | | | ||
| | | | ||
|- | |- | ||
![[File:Shiren 6 - Top Menu Story Arc Icon 27.png]] | ![[File:Shiren 6 - Top Menu Story Arc Icon 27.png]] | ||
|{{Shiren6|Isle of the Mighty (Story Arc)}} | |{{Shiren6|Isle of the Mighty (Story Arc)|Isle of the Mighty}} | ||
| | | | ||
| | | | ||
Revision as of 20:16, 28 October 2024

The Top Menu (Japanese: ???) is the menu that opens after the Title Screen in Template:GameTitle. It is the second menu seen by players when loading the game after the first save file is created, and the game features are accessed from there.
Display
The menu is on the left of the screen. On the right, there is a card displaying information on the player, such as the name, current location, Rescues available, HP, Fullness, Adventure count, and completed Story Arcs.
- Resume Adventure: Continues the game where it was left off.
- Rescue: Gives access to Rescue features.
- Parallel Play: Gives access to Parallel Play features.
- Achievements: Check Achievements and their rewards.
- Config: The game settings, also accessible while playing.
- Game: General settings.
- Controllers: Allows rebinding buttons.
- Internet: Choose whether to enable or disable Internet features.
- Back: Returns to the title screen.
Icons
Top Menu icons are small pictures that appear on the card to track which progress in the game. There are 30 icons, of which 28 track the completion of Story Arcs, 1 that was added in version 1.1.0, and 1 that was added in version 1.2.0, for unlocking Kokatsu Shiren and Tatsumi Shiren respectively. Before the requirements are met, the displayed icon is a question mark. With Part 1 of the DLC, another one was added in version 2.0.0 for unlocking Koppa.
| Icon | Objective | Unlock Requirements | |
|---|---|---|---|
| English | Japanese | ||
| Available in the base game. | |||
| Serpentcoil Island | |||
| Suiryu | |||
| Kokatsu | |||
| Reconciliation | |||
| The Two Pirate Gangs | |||
| Peach Club | |||
| Secret Ninja Village | |||
| Secluded Path | |||
| Ghost Ship | |||
| Golden Highway | |||
| Yamakagashi Pass | |||
| Training Path of Inference | Complete Training Path of Extra Inference. | ||
| Asuka | |||
| Porky the Pirate | |||
| Tugai | |||
| Hibiki | |||
| Sumo Dungeon | |||
| Training Path of Gimmicks | |||
| Training Path of Shopping | |||
| Behemoth Rush | |||
| Sacred Ocean Tunnel | |||
| Domain of Staves and Scrolls | |||
| Isle of the Mighty | |||
| Available in Ver. 1.1.0 | |||
| Unlocked "Kokatsu Shiren" to adventure as | |||
| Available in Ver. 1.2.0 | |||
| Unlocked "Tatsumi Shiren" to adventure as | |||
| Available in Ver. 2.0.0 (with DLC Part 1) | |||
| Unlocked "Koppa" to adventure as | |||
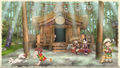
Wallpaper Art
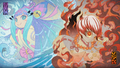
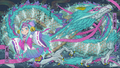
The default wallpaper art shows Shiren in front of Mount Jatou. Additional wallpaper art is unlocked by completing Achivements. Once unlocked, random art from the selection is displayed. Holding Y hides the menu so the art can be admired. Pressing - changes the art without having to leave and re-enter the menu. While awaiting Rescue, there is special wallpaper art that is otherwise not displayed.

Default.

While awaiting Rescue.

Achievement reward.

Achievement reward.

Achievement reward.

Achievement reward.

Achievement reward.

Achievement reward.

Achievement reward.

Achievement reward.
Achievement reward.

Achievement reward.

Achievement reward.
Achievement reward.

Achievement reward.

Achievement reward.

Achievement reward.

Achievement reward.
Achievement reward.


Background Music
 | This section is under construction or in need of expansion. You can help the Mystery Dungeon Franchise Wiki by expanding it. |
In Other Languages
| Language | Name | |
|---|---|---|
| English | Top Menu | |
See Also
| Achievements (Achievements List • Rewards List) • Adventure Logs • Adventures • Aid Points (Obtainable From Items) • Behemoths (List) • Blessings • Bouncy Walls • Buried Items • Cannons (List) • Cross-Mixing • Curses • Discounts • Dungeon Stores • Fever Time (List) • Floors • Gear Rack • Gitan • Handy Dash • Hidden Passages • Hidden Routes • Kron's Challenge • Maze Rooms |